


How many of us struggle with tasks that should be easy and straightforward because we chose a tool that isn’t right for the job? Have you ever tried to loosen a screw with a dime, hammer a nail with a wrench, undo a tight nut with pliers, or open a plastic container with your teeth? Pretty frustrating, and not so easy. Thinking we are saving time, taking a shortcut turns an easy job into a nightmare. We all know that if we choose the correct tool, the job is simple. The same can be said about aligning wind turbines, which is a fairly easy task with the right tool in hand. The main purpose of all advanced tools is to make the job fast, easy, and accurate. If we can take the human error out all of our daily functions then we would be less confused and frustrated, wondering where it all went wrong. Technology and innovation is supposed to make our daily lives easier, after all.
Choosing the Right Tools
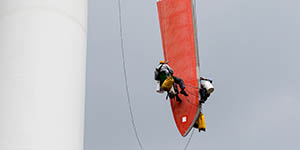
There are several issues associated with wind turbine alignments that make the job more difficult than traditional shaft alignment. It starts with climbing the tower in all sorts of weather conditions; anywhere from well below zero to over 100o F, plus heights close to 300 feet. When we arrive at the top of the tower, being physically and mentally tired is a normal condition. Shaft diameters are large, so extension chains must be used. There is always the angst over the accuracy of dimensional inputs. Brake calipers are obstructing the rotation over the top, so measurements are made underneath and against normal rotation, which can induce backlash. The generator is mounted at an angle and can slide if all four feet are loose at the same time. To maintain the coupling gap tolerance at +/- 1 mm, only three feet (hold-down bolts) on the generator can be loose at a time. Generators are heavy, so we lift with hydraulics, and most sites don’t have jacking bolts for the horizontal positioning. In most cases the thinnest shims used are only 0.5mm. However, we recommend taking shims from 0.1mm to meet current alignment tolerances. And finally, record-keeping has become essential so storing as found, and finished alignments are required. Now let’s see how easy aligning wind turbines will be by eliminating all of these concerns. Figure 1
After climbing the tower, the mental and physical condition is important. Take the time needed to make your brain and body ready for the alignment process—hydrate, clear your head, and recover your strength. First and foremost, complete all safety checks and lock out /tag outs. Then pre-alignment duties ensue, which involve taking off the coupling guard, in some cases installing a turning gear and a rotor lock, if neither are used the brake will be engaged. After pre-alignment is completed we need to mount the lasers on the gearbox brake disk and generator coupling hub. This step is extremely easy. The GO Wind and XA Wind kits by VibrAlign are configured with customized magnetic mounting hardware for each OEM’s turbine design, including GE, Siemens, Gamesa, Mitsubishi, Vestas, Nordex, and Suzlon. This hardware is designed to eliminate chains and clear all obstructions. Also, the GO Wind and XA Wind alignment process and programming are the very similar, so a “re-learning” process is not required by the technicians. The following process will work in a similar fashion.
The “Verti-Zontal” Compound Move
First step in the alignment is to check for “soft foot.” We need a flat plane for all four feet so that the generator won’t twist. This is done by loosening one foot at a time and seeing if there is any movement with the shims under that foot. Since the generator is heavy, use a pry bar or channel lock to see if the shims slide or move. If the shims move, try a feeler gage or precut shim to determine the amount of soft foot. General industry specifications call for no more than 0.05mm as the maximum allowable soft foot. Place the proper amount of shim under the foot to eliminate the soft foot condition. If there is no movement, tighten the bolt and repeat for each of the four feet. With the GO Wind software, just pick from the list of proper turbines and coupling styles. This will load all the correct dimensions and alignment tolerances. Figure 2
Now the setup is complete and ready to take readings to evaluate the alignment condition. Rotate the shafts so that the laser heads are somewhere near the 9:00 position, press OK, now rotate the shafts out of the shaded area just short of 12:00, press OK, and finally rotate to the 3:00 position and press OK. The result summary screen shows the current alignment condition, or “as found.” If it’s within tolerance, just save the alignment values in the GO Wind for your records; the file format is a bitmap/text file with no need for additional software.
If an adjustment is needed on the generator, a “Verti-Zontal” Compound move will be preformed. With true position sensing, the rotational center lines of each shaft relative to each other is always known at all times, no matter how much you move the generator and/or gearbox. In other words, the GO Wind knows where the generator and gearbox are sitting even when the generator is pushed, pulled, or lifted through the whole alignment. This technology allows for the vertical and horizontal move to be completed without having to re-measure, or more importantly having to loosen and tighten hold-down bolts over and over again. Figure 3
Two rules about the first step in your Verti-Zontal Compound move: Always perform the vertical adjustment first. Never do the vertical adjustment live or in real-time mode, since the values will change as soon as the bolts are loosened. Because there can be only three bolts loose at any time, vertical values at the feet can jump and move around. Adjust the both back feet by the value the GO Wind displays in the summary screen, minus = too low, plus = too high. Here is where the 0.5mm shims can create a mathematical nightmare, so let’s make it easy. The rule to follow is to adjust the feet so that both sets, front and back, will have the same sign, with the back feet a bit larger value than the front. An example would be if the back feet show that you are 0.8mm low (-0.8) and the front shows that you are 0.4mm high (0.4), the easiest solution would be to add 0.5mm to the back feet, making the value -0.3mm and removing 0.5mm from the front making the value -0.1. Now both sets of feet are the same sign, with both low and the back feet a bit lower than the front, and the alignment tolerances are met. However, if the proper shim variation of 0.05mm to 2.0mm are used this calculation can be eliminated. Figure 4
Once we have corrected the vertical we now can complete the Verti-Zontal Compound move by selecting the correction key (shim icon) and moving the generator in a side-to-side or horizontal move. Do not tighten the bolts, since we are moving horizontally first. The GO Wind makes this simple by displaying arrows pointing in the direction you need to move. Adjust by using a jack bolt kit, and move the largest value slowly. Once in tolerance the arrows appear as arrowheads only, and the offset and angularity icons will have clear backgrounds. Now tighten the hold-down bolts in a crisscross pattern in three passes—first snug, then tight, and now tightest. Since torque wrenches may not be used at all times, it’s good practice to have the same technician loosen and tighten all four bolts. Figure 5
Now measure for our final alignment condition. After the measurement is completed the summary screen will show that the alignment just completed has the correct tolerances, and the final condition can now be recorded. Save the measurement, and you are done with the alignment process. Using this Verti-Zontal Compound move process alignments now can be completed in under 30 minutes.
Conclusion
Pretty easy, wouldn’t you say? What makes the alignment process easier now for the wind industry is the Verti-Zontal Compound move, which eliminates two to three steps of the old aligning process, not to mention less wrench turning in the process. This is why aligning a wind turbine just got easier. So the next time you’re performing this operation remember that taking a moment to choose the right tool will result in greater accuracy and fewer headaches!


